I figure there are some stock market bargains out there - somewhere - if you can find companies who's stock price is beat down but who have solid fundamental business measures... and, of course, if you'd otherwise be in Vegas, but can't afford to get there given the economy... So I tried something fun that seemed worth sharing...
I used the Google Finance stock screener to look for companies with:
- stock down more than 50% in the past year.
- Price/Earnings ratio between 0 and 10 (well priced (?), but still positive).
- Positive 5-year Net Income growth rate - still growing earnings.
- No Debt (debt to assets ratio of zero)
It's a really fun thing to do - since you can slide each of the screeners and see the number of companies change in real-time - and you can add criteria from a pretty large pre-selected list of data points.
Here's the exact stock screen I used.
On Jan 27, that screen produced 28 companies...including some old favorites like Ann Taylor, Build-a-bear and Garmin, amongst the others.
I copied and pasted the data into a Google spreadsheet (you knew that, didn't you) - and added a few columns to see what would have happened if I bought a bit of each...
For this first test, I didn't bother trying to weight the different stocks according to anything, not even to even out the amount invested - I just went simple and theoretically bought 100 shares of each... theoretically investing around $21k... and then I added a column to pull the current stock price of each of those 28 companies.
(see the whole spreadsheet here)
Results so far? Well - since Jan 27 through Feb 20, I'd have lost around $1,400 - or 6.5% of my investment... In that same period, the Dow lost 9.9% - so, as Bill Murray says, "uh, I got that goin' for me".
I just like the process - not sure I'll actually act on any of these self-found "tips" - but I like that I can easily find stocks which fit my own dreamed up criteria and then watch them easily in a spreadsheet...
If you want your own copy of that spreadsheet, go to this page where the spreadsheet itself is fully described.
(and, of course, I'm not giving any financial advice here, and if historic results were any indication of future results, you shouldn't listen to me anyway)
Ideas, opinions, how-to's, and other discoveries related to virtually any product, but usually web products
Saturday, February 21, 2009
Monday, February 16, 2009
My Tracks on the G1 is oh so sweet
If you're in tech, you've always sought the killer app, and while I know it's a plural (after all, I've got several killer apps near and dear), there's one that hit me right between the eyes this weekend - and I'm telling everyone. It's on my G1/Android phone. It's called "My Tracks". It was developed at Google - but that has nothing to do with my feelings expressed here. Seriously - it could have been developed by Bernie Madoff (oh - more on that soon) and I still might have to love it.
The main reason for my instant adoration of this product is based on my prior experience in custom mapping... Almost exactly a year ago, I painstakingly clicked off about 4 different hikes using the original My Maps feature of Google Maps - trying to re-create the exact path taken through some wooded hikes. At the time I was raving about how cool it was that I could create those maps and share those hikes - but, I realize now why I rarely went back to do more. It was just too much effort (oh - poor me... 5 minutes of clicking a mouse is too much effort... really - I need a dose of pre-tech life). It all comes down to convenience. The number one rule of successful products - convenience.
I mentioned the maps to my brother in law, who told me I could borrow his awesome Garmin everything-GPS device to track my next hike, "I haven't taken the time to figure it out yet - so you can try it and then show me", he says... so I tried it. Got some interesting... uh... "results"... Some elevation info...that's about it... and carrying this awkward, 1970's cell phone looking thing... I never figured out how to actually get the data out of it.
This time - I take my two boys bike riding on a cold day at a nearby park. I take my phone (which I'm carrying anyway, duh), and click My Tracks - Menu - Start Recording. Done. Put it in my pocket and never looked at it again until 60 minutes later when we got back to the car. Stop Recording. More - Send to Google - Send to My Maps. Done.
I get home and bring up My Maps. OMG. In an area which was otherwise blank, I now see my tracks around the park's different bike trails... I even see one anomaly - a single track across the grass when I was trying to play a trick on my kids to get ahead of them. Busted! Then I click on the push pin in the area of the parking lot, where our ride ended... OMG (again) - Time moving, average speed, average speed when moving, elevation traveled, min elevation, max elevation, etc. Wow. "Craig!" I yell to my Bro'in-law - who's with us with his kids that day, also a gadget freak and the owner of that, uh, great GPS device I mentioned earlier. "Check this out"... "wow". I know he went home and put that ol' GPS device up on ebay.
Anyway - you'll see some of the pics I've included of that first experiment including the detailed riding around in circles I did in the park... which, unintended, is a great show of the detailed capture used in this killer app. I'm suddenly motivated to hike, to bike, to walk anywhere... I'll never leave my G1 home again (anyone wanna buy a first gen iPhone with Jelly Car pre-installed?)
Wednesday, February 11, 2009
Plastic Rating System - unhealthy opinions vs. facts
There was something bugging me when I got back from the recent conference I attended... but it wasn't until I refilled the re-usable water bottle from my office that I remembered what it was. Those two gentlemen sitting near me during a break were talking loud enough for me to hear and become interested: "Hey Charlie, I'm ok - my bike bottle is a 2 and my other bottle is a 1 - so thanks for the info". Once it was clear that they were discussing the safety of plastic drinking bottles, I had to ask them to inform me. They told me that the codes on the bottom of every plastic bottle indicate different plastics which correlate to the safety of the bottle.. "1's are the safest and 7's are the most dangerous, generally", they said. "Wow - thanks guys - I'll take a look when I get home!".
So a few days later, with my new "green" water bottle in hand, I remember this discussion and flipped over my bottle - huh? "SEVEN!?", I said out loud. Time for some research, since it's hard to believe I would be given a water bottle which is good for the environment but bad for me. Well - it turns out I wish I had gotten the contact info for those two gentlemen - no, not to yell at them - but to tell them the facts. The codes are there as information for recycling - to identify the resins which make up the bottle. They're not intended to indicate safety.
The codes do provide, in a few cases, enough information to know you should avoid a certain bottle - for example, Code 3 is PVC (PolyVinyl Chloride) and Code 6 is PS (Polystyrene) - those seem to be universally accepted as the "avoid at all costs for food and drinking" type. Code 7, it turns out, is the "Other" type, which is a catch all to mean "either really dangerous (Polycarbonate) or really safe or something in between, depending on what it's made of". Ah, really helpful. And while Code 1 (PET/PETE - Polyethylene Terephthalate) is the most common for recyclable drink bottles in the US, just don't re-use it, heat it or scratch it. It seems the other codes - 2, 4 and 5 - just haven't had any conclusive research as of yet. Does that make them safer than those we know can harm you?
Regarding the relative "safety" of one type of platic versus another - particularly when using the recycling codes as virtually your only consistent guide - the LfT-Group (Live for Tomorrow) sum it up best:
"You may wish to seriously consider your – and especially your children's – use of plastics numbered 1, 3, 6 and 7 (polycarbonate), all of which have been shown to leach dangerous chemicals. This does not necessarily mean the others are completely safe, just that they have been studied less to date. So if you have to use plastic, it is safest to stick to numbers 2, 4, 5 and 7 (other than polycarbonate) whenever possible."
In my quick search for information (not the same as "research"), I found a few more links worth sharing with those of you who cared enough to read to here:
Health facts by each recycle rating
Lots of health information by each recycle rating
Complete information by each recycle rating (pdf)
Plastic bottle quick FAQ by type
Plastic bottle safety FAQ
General information on plastic rating system (wikipedia)
Good article on plastic containers
Be plastic-aware - dangers of each type
International Universal Recycling Codes
Official Recycle coding system from Hong Kong Environmental Protection Dept.
(NOTE: The folowing are internet sites of the American Chemistry Council® (ACC), which represents the leading companies engaged in the business of chemistry, including significant business groups such as the Plastics Division and the Chlorine Chemistry Division.)
American Chemistry Council's (ACC) Facts on Plastics site.
ACC Rumors and Myths about Plastics
ACC 2006 United States National Post-Consumer Plastics Bottle Recycling Report
ACC Official Resin Codes Chart (PDF)
Monday, February 9, 2009
Embed a form in your blog post to collect data fast
In a recent post regarding using forms to collect data easily, a couple of people thought I should have used my own advice for one of the collection methods - that is, to embed the actual form in a web page - in my blog post in this case. Great idea...
So - below is an embedded version of my Blogging Survey. Took me literally 30 seconds to get the embed code from the "Form" menu of the spreadsheet. This is just a sample survey, but feel free to answer this survey and I'll post results soon if I get enough respondents.
The value of Collaboration learned from political campaigns
I would never have expected to see anything related to the political process as a model for business collaboration - but I guess this is part of "change". Just a couple of (old-ish by now) links to anecdotal evidence of how powerful web-based collaboration can be. In these examples, it was Google Docs (spreadsheets) used as a tool in the 2008 US presidential campaign process...
From Huffington Post:
"While the presidential contenders had enlisted technologies such as Facebook, YouTube, Twitter and LinkedIn, which all received a great deal of attention, it was Google Docs which had the most amount of influence, in spite of receiving the least amount of attention.
... The Obama campaign was aware that this had become a major player in the grassroots space, sparking a revolution in the way people self-organize and conduct grassroots efforts and political campaigns. Since a campaign is constantly on a quest for money and voters, Obama's grassroots organization valued agility over hierarchy; online collaboration became a necessity."
From DailyKos:
"All of us have access to the data, and Google has quick and easy ways to share that data (while retaining the privacy of our volunteers) with the Oakland Campaign headquarters.
... With the advent of Google Docs, what was once a fact of life in community organizing, the lost, corrupted and out-of-date sign-in sheet, has become a much more powerful tool."
Wednesday, February 4, 2009
Small Business Web Tip: Collect data quickly using a web form
At the Small Business Technology Summit this week, I was asked "what's the one action these small businesses can do today to have an impact on their business" (I put that in quotes - but I'm sure I've tweaked the question a bit to match my answer ;).
I answered, "Create a form - a survey - for free, which you can email to your customers to immediately find out what they think of your product or service". A bunch of people asked me for more information - so I figured it would be useful to post a quick "Web Tip" here... If you don't feel like reading, there are also plenty of public videos on this topic done by others.
If you want to first get a sense of what one of these Forms would look like, you can answer my example survey about blogging. If you do, try to really answer it, and maybe we'll get some useful results I can share.
The below might seem like a bunch of steps, but this can literally take 10 minutes - it's the thinking about which questions to ask and what multiple choice questions to offer, which is the hard and important part.
How to collect data for free using Google Docs Forms:
Step 1:
Go to Google Docs - http://docs.google.com
Sign-in or get an account. You need a google account, but that doesn't mean a Gmail account necessarily (see my old video on that topic).
You should see your list of Docs - if you've used the service before - or an empty list (which, actually then, isn't a list at all if there's nothing in it... it's just a frame)
Step 2:
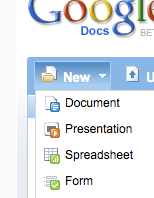
Click the "New" dropdown button on the upper left - and choose "Form".
You'll be taken to a new window which is the "Form Editor". It starts you off with an automatic first question called "Name" - just to remind you that you may want to ask (optionally) for the respondants name - and leaves you in edit mode on question #2.
When editing the form - you edit one question at a time (click the pencil button on the right) and click "done" as you finish setting up each question.
At this point you can go back and edit the first question (example - add some help text to tell people that "Name is optional, but helps me know who you are").
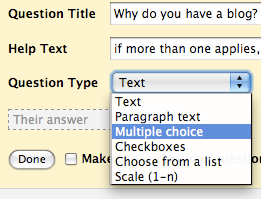
The default field type is "Text" - but you *should* use multiple choice or scale questions where possible - as those give great quantitative summaries - and if you want people to type a more descriptive answer, change the question type to "paragraph text".
Step 3:
Finish entering all your questions and click the "Save" button at the top. Keep the form rather short if possible - nobody likes to answer a long survey - and you won't want your second survey to be ignored if you decide to do another one in a few weeks/months.
Step 4:
Make your own confirmation message. After someone responds to your form, they get a generic "Thanks!" message - but you can edit that to create your own message. You can include valid URLs to have a link on that page. At the top of the form editor, there is a "More Actions" button. Click that and select the option "Edit Confirmation".
Step 5:
Send the form! You have a few ways to get the form into the hands of your potential respondents:
1 - Send the form using email... If you select the "email this form" option, you can enter the email addresses of respondents and they will get the form EMBEDDED in their email message if they use Gmail or Yahoo mail (those are the only popular mail systems which allow that) - or - they will get a link to a separate web page which contains your form.
2 - Embed the form on your blog or website. The other option in the "more actions" button is "embed" - that gives you the HTML code you can embed in your blog post, blog template or website so people can answer the form directly from there.
3 - Get the URL of the form and IM/mail it directly to your potential respondents. The URL can be copied from the bottom of the form editor screen, where it says "You can view the published form here:".
Step 6:
Go see your form. Click on that link at the bottom of the Form Editor to make sure your form looks as you intended. That's how others will see it. [NOTE: You can test the form, but there is currently an issue where the form response count will not be reset, even if you remove your test response]
Step 7:
See your responses! The form you created actually created a spreadsheet in the background. After saving your form - close that form editor window and go back to your Google Docs list. Find your form/spreadsheet on the docs list and click it to open it. You'll see a spreadsheet with the questions you asked as the column headers (with one additional column as the first, which is the timestamp of each reply). If you already sent the form out, the spreadsheet may already contain responses which have been received. If you hang out there for a while, you may even see responses appear in real time (that's fun).
Step 8:
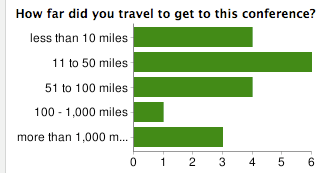
See your reponse summary. From the spreadsheet, click on the "Form" menu at the top and click on "Show Summary". That takes you to a page which summarizes, in chart format where feasible, the responses to each question.
Step 9:
Set up notifications so that you know when people respond to your form.
Click the "Share" button (on the upper right of the spreadsheet window) and select "Set notification rules". In that dialog, select the options "[when] A user submits a form", and choose either "Email - dialy digest" or "Email - right away", depending on how many responses you expect to get and how much you want to spam yourself.
Some Tips:
> *Do not* try to re-arrange the questions on the spreadsheet itself. There are issues where the form and the spreadsheet get out of sync if you do that. Re-arranging should be done from the form editor only - where questions can be dragged and dropped into the order you want them.
> There is not yet a way to restrict people to filling out the form only once.
> *Do not* "PUBLISH" the resulting spreadsheet or set it to "Anyone can view" unless that's really what you need. Those settings are NOT necessary to make the form broadly available, and it might let people see the results of the survey which you may not have intended.
> If you are HTML-ready, you can take the Form page and tweak the HTML to give it style or additional logic - just *never* change the POST URL or the NAME ATTRIBUTES on the HTML form object in that page. You'll also need your own place to host the updated HTML page. This isn't something you'll be able to get much support on from the Google Docs help center - so only do this if you are feeling lucky ;)
Have fun!
Tuesday, February 3, 2009
Small Business Summit in NYC
I attended the Small Business Summit in NY yesterday. Met many great people and had an opportunity to be on a Panel with Michael Shultz (Microsoft) and Harry Brooks (Network Solutions) moderated by Brent Leary (CRM Essentials and Business Technology Radio). I Had a chance to express some of my thoughts about how web-based social media and collaboration tools create opportunities for people to "keep and nurture loyal customers" (that was the official title - though we covered a wider set of concepts). Also got some great reminders about what small business focus on every day - and in particular, the importance of the search and ads side of the web. That stuff is highest on the small businesses "need to know, need to improve" list in most cases. More coverage of the conference can be found here.
There were a couple of points made during and after our panel which probably warrant more instruction and link or two for those of you who couldn't understand my babbling and happen to find me here... Here's two I can think of - but ping me here if there were others.
Create a Form on Google Docs
I suggested that you "Poll your customers and get their opinions directly and immediately [into a spreadsheet]"... Here's a link to the Google Docs Help Center on that topic. I'm also going to post a quick how-to here on my blog soon, since so many people have asked me for detailed instructions and a sample. (look for that soon)
[Update Feb 5: Here's that "Creating Forms" web tip post]
Use YouTube to collect videos about your product or service
I mentioned how you can create a channel on YouTube to collect videos about a specific topic, which could be useful for prospective customers, particularly when current customers have created those videos. We did that on the Google Docs team - we created the Google Docs Community channel. It's good for customers, for discovery and for the video creators who want more views/exposure.
Subscribe to:
Posts (Atom)